About Partha Mehendale –
Partha is an ex-engineer, a self-taught brewer, a yoga practitioner, and the slowest eater
you’ll ever meet. You’ll often find him sipping on a chai-gone-cold while reading up on random trivia or tending to his herb garden.
Over the past few years, he had gone from not knowing about the existence of craft beer to becoming the head brewer at Yavasura. A free spirit, he sometimes still cannot believe that he no longer have to sit at a desk all day but that he get to brew liquid gold for y’all instead. One of his favourite parts of the job is to work on beer recipes that will blow your mind. Hoping to catch a pint of Yavasura with you one of these days!

DIY STIR PLATE
A serious homebrewer would invariably want to shift to making yeast starters at some point. Yeast starters will be GUARANTEED to improve the quality of your beer and improve your control over yeast and fermentation. Starters ensure that you always pitch an adequate amount of healthy yeast. And one of the MOST efficient ways to make a starter is by using a stir plate.
I honestly did not even bother looking where I could buy one from since building a DIY stir plate is SUPER easy and economical. This project is right up your alley if you like building DIY stuff. And even if you don’t, you should still consider building or buying one- a stir plate will definitely be a worthy addition to your arsenal.
WHAT IS A STIR PLATE
A stir plate is a device that uses magnets and a motor to spin and keep the liquid in constant motion. In brewing, stir plates are used to propagate yeast. The spinning motion creates a vortex in the yeast starter. This motion continuously aerates the wort giving a high growth rate.
Alright, so let’s start building one!
WHAT YOU NEED
Magnetic stir bar –
This magnet is going to spin about its centre, in turn spinning the yeast starter creating a vortex. You get stir bars in different sizes. Choose one based on the size of your conical flask. For reference, I use a 2.5cm stir bar for both my 2-litre and 5-litre Erlenmeyer flasks.
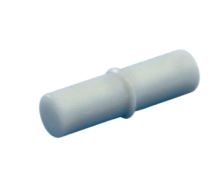
These are available with any laboratory equipment supplier. You can also try searching on the internet to buy this.
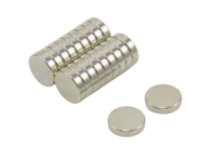
Neodymium magnet –
You need 2-3 of these magnets, but you will need to buy an entire stack of 10- I did not find
any seller selling it loose. Choose magnets that are about 1cm in diameter. A neodymium
magnet is the most common type of rare-earth magnet. These magnets are going to help
spin the magnetic stir bar.
These can be bought on the internet.
Computer fan –
This is literally a standard desktop computer fan. You will be sticking the neodymium magnets on this fan in such a manner that when the fan spins, the magnets spin as well.
Buy a computer fan from any computer repair shop or you can get one online too.
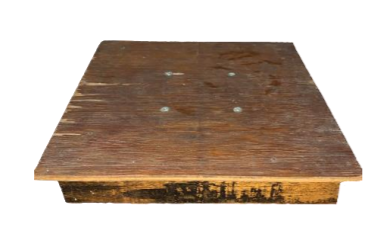
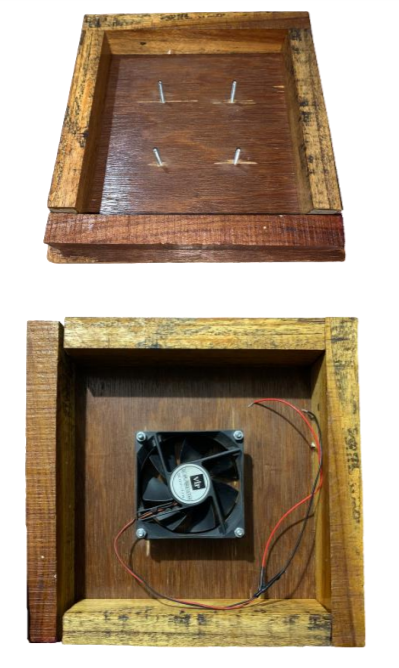
A sturdy box or container –
Find a box or container that is large and sturdy to hold your yeast starter container. The computer fan is also going to be fixed to this. I had a square piece of 3-ply lying around. I
added some wooden pieces to mount the ply and the basic structure of my stir plate was
ready.
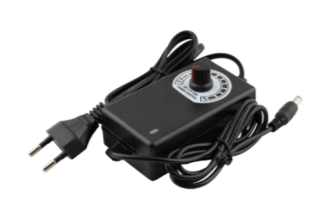
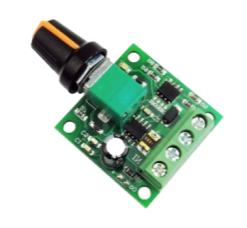
DC Power Supply Adapter (12V) with a voltage regulator –
This is what is going to drive the computer fan. Search for an adapter that comes with an
in-built voltage regulator, or you can also buy a PWM (Pulse Width Modulation) DC Motor
Speed Controller. Either case, you WILL need a regulator to control the fan speed or the
speed of the fan will throw off your magnetic stir bar.
You can buy either regulator online. If you want to go for the PWM, search exactly what I
have written above and you will be able to buy that.
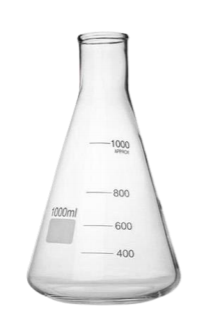
An Erlenmeyer flask (conical flask) or a glass container with a flat bottom –
These are not really a part of the stir plate, but you would need some sort of container (with
a flat bottom) to hold the yeast starter in. The magnetic stir bar would also be placed in it.
I prefer using Erlenmeyer flasks.
Erlenmeyer flasks usually come in a variety of sizes. If your normal batch size is 20 litre, a
2-litre conical flask is sufficient. I would also suggest getting a 250ml or a 500ml
Erlenmeyer flask. These are necessary when you want to BUILD UP starters.
You can buy a conical flask from any laboratory equipment supplier. These flasks are
common; I do not think you would have any trouble finding these.
Other parts and materials –
• Nuts and bolts for the computer fan
• A strong, instant adhesive like Fevikwik
• Extra wiring
PROCEDURE
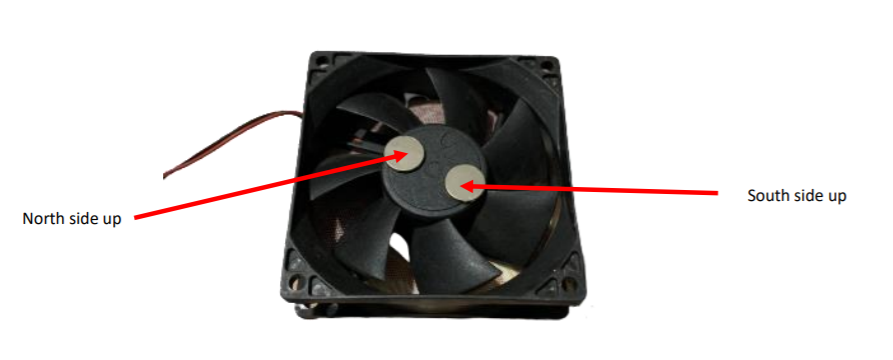
- Start by sticking the neodymium magnets on the computer fan. One magnet should
have its north pole facing up and the other should have its south pole facing up.
Make sure you stick the magnets ON the fan so that they also rotate with the fan. - Next, you need to attach the computer fan to the box/container. You can drill small holes and use nuts and bolts to fix the fan OR you can use an instant adhesive here as well. The magnets-side of the fan should be facing the inside of the box/container.
3. Cut the wire of the DC power supply adapter at a suitable length. Connect the positive wire (red) and the negative wire (black) of the computer fan to the positive and negative wire of the adapter.
4. If you are using a PWM Speed Controller, there will be some additional wiring required. There should be a diagram provided with the controller.
5. To test, fill some water in the conical flask and put the stir bar inside the flask. Adjust the position of the flask so that the stir bar is in the centre.
6. Turn on the power supply.
7. The stir bar should start spinning creating a vortex in the water.
8. You can control the speed of the fan using the voltage regulator to prevent the stir bar from getting thrown off.
That’s all there is to it! There are plenty of calculators available online to calculate the number of yeast cells you will get. If you have any doubts, do post in the comments section below! Happy brewing!
Click here to buy Yavasura’s Crème Noir Milk Stout.
Click here to purchase your Compact adjustable magnetic stirrer machine
Pingback: mesalamine copay card
Pingback: priligy prescription
Pingback: does doxycycline treat strep throat
Pingback: minoxidil tablets online
Pingback: acyclovir 5 ointment 15gm
Pingback: bupropion tablets picture
Pingback: toradol reference page
Pingback: ketorolac onset
Pingback: toradol short term pain relief